Photorealistic Rendering Architecture

If you’re delving into the world of “Photorealistic Rendering Architecture,” you’re likely seeking to transform abstract architectural ideas into tangible, lifelike visualizations. This need arises from the desire to accurately communicate design concepts, bridge the gap between imagination and reality, and make informed decisions before the actual construction begins.

Photorealistic renders serve as a powerful tool, enabling architects, clients, and stakeholders to visualize and refine architectural projects with unprecedented clarity and detail.


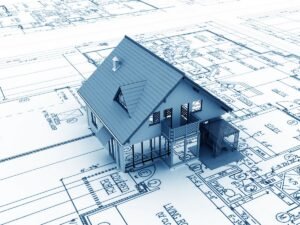
Photorealistic rendering in architecture involves creating highly detailed, realistic images using advanced computer graphics. This technique transforms architectural designs into 3D visualizations that are almost indistinguishable from real-life photographs, allowing for a clearer understanding and presentation of architectural projects.


This blog will guide you through the nuances of photorealistic rendering, covering various aspects such as types of architectural rendering, essential tips for achieving realism, and the impact of technology on this art form. Whether you’re an architect, a student, or simply an enthusiast, the insights shared here will deepen your understanding and appreciation of this fascinating field.

What is Photorealistic Rendering in Architecture

Photorealistic rendering in architecture refers to the process of creating highly detailed, lifelike images of architectural designs using advanced computer graphics techniques.

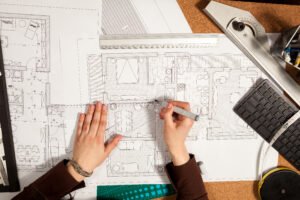
This method transforms blueprints and design concepts into 3D visual representations that are as close to reality as possible. It’s an incredible tool, especially when you need to visualize how a building or space will look before it’s built.

The evolution of technology has significantly impacted the quality and capabilities of photorealistic rendering.

Advanced software and powerful computing resources enable architects and designers to add intricate details, realistic textures, and accurate lighting to their renders. These features help in creating images that not only represent the structure but also evoke the atmosphere and feel of the space.

Personal Insights: The key to successful photorealistic rendering lies in the balance between technical precision and artistic creativity. While the software does the heavy lifting, it’s the architect’s vision that breathes life into the render. I suggest starting with a clear understanding of the project’s purpose and the emotions you want to evoke. This clarity will guide your choices in texturing, lighting, and detailing, making the render not just photorealistic but also emotionally resonant.

Tips for Photorealistic Architectural Rendering
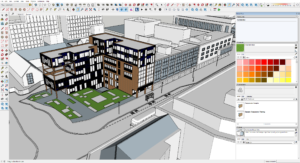
Tools and Software

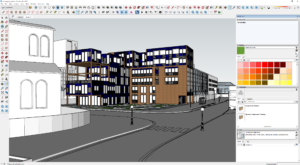
When it comes to photorealistic rendering in architecture, the software you choose plays a pivotal role. Programs like 3ds Max, V-Ray, and SketchUp offer diverse functionalities that cater to different rendering needs.

Familiarize yourself with the strengths and limitations of your software. It’s like choosing the right type of paint for a canvas; the better you know your tools, the more effectively you can use them.

Lighting and Shadows

Lighting isn’t just about making your render visible; it’s about setting the mood. The way light interacts with the environment can drastically change the perception of space.

Pay attention to both natural and artificial lighting. Experiment with different times of the day and observe how shadows fall. This attention to detail can make your render go from good to breathtaking.

Texture and Material Realism

In the world of photorealistic rendering, textures and materials bring a design to life. The key here is subtlety. Real-world materials are never perfect; they have imperfections, variations, and unique characteristics.

Include these nuances to add depth and authenticity to your render. Remember, it’s these little details that often make the biggest difference.

Composition and Framing

Think of your render as a photograph. How you frame and compose your image can tell a story. Experiment with different angles and perspectives.

Showcasing your design in various contexts, such as a bustling street view or a serene evening, can provide a comprehensive understanding of the space. It’s not just about showcasing a building; it’s about presenting a world where that building exists.

Environment and Context

A building doesn’t exist in isolation. Its surroundings play a crucial role in how it’s perceived. Include elements like vegetation, people, and neighboring structures to give your render a sense of place.

This doesn’t just add realism; it also helps clients understand how the project fits within its environment.

Types of Architect Rendering

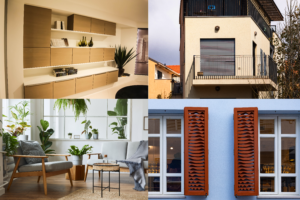
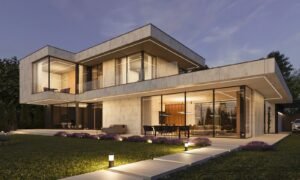
1. Residential Exterior Rendering

Residential exterior rendering is all about creating a warm, inviting image that captures the essence of a home. The focus is on portraying a livable, attractive space that potential homeowners can see themselves in.

Key elements include the use of natural lighting, the integration of the landscape with the building, and attention to the textures and materials of the exterior. It’s essential to convey a sense of comfort and practicality, showing the home in various settings like dawn, dusk, or with seasonal variations to give a comprehensive view.

2. Commercial Exterior Visualization

When it comes to commercial exterior visualization, the approach shifts significantly. Here, the emphasis is on showcasing the structure’s design, scale, and its integration within a commercial or urban setting. This type of rendering needs to communicate the functionality of the space while also highlighting architectural uniqueness.

Details like the flow of people, the interaction with the surroundings, and the use of commercial spaces are crucial. Lighting plays a different role here, often used to emphasize the building’s geometry and design features.
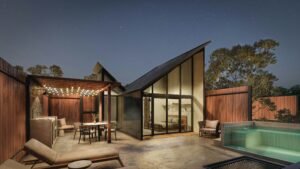
3. Hospitality CGI

Hospitality CGI, covering hotels, resorts, and other leisure facilities, demands a unique approach. The goal is to evoke a sense of luxury, relaxation, or excitement, depending on the property’s character.

This type of rendering often includes detailed interiors, lush landscaping, and amenities like pools or dining areas. It’s not just about the building but the experience it offers.

Vibrant colors, dynamic lighting, and a focus on the ambience are key components. Creating a sense of place and an emotional connection with the viewer is paramount.

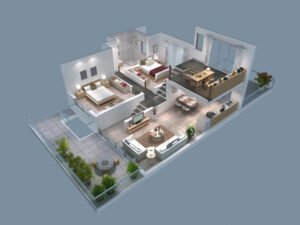
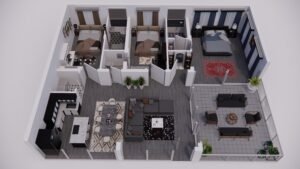
4. Residential Interior Rendering

Residential interior rendering is a fascinating realm where the goal is to create a space that feels like home. This type of rendering focuses on the intricacies of interior design – from the furniture and fixtures to the textures and color schemes.

The challenge here is to evoke a sense of comfort, functionality, and style. Lighting plays a crucial role, highlighting the living spaces’ warmth and ambiance. Elements like window views, the interplay of indoor with outdoor spaces, and even small details like décor and household items, are vital in making the space feel lived-in and realistic.

5. Commercial Interior 3D Visualization

Commercial interior 3D visualization, on the other hand, demands a different approach. This style caters to business environments such as offices, retail spaces, or restaurants. Here, the focus shifts to showcasing the functionality and the brand identity of the space.

It’s crucial to convey how the space facilitates business activities while also maintaining an appealing aesthetic. Key elements include the layout of the space, the use of corporate colors and branding, and the integration of technology.

Lighting is used more strategically, often to highlight key features or create a specific mood conducive to the business’s nature.

Conclusion

Photorealistic rendering in architecture is a game-changing technology that enhances the visualization and presentation of architectural designs. It bridges the gap between conceptual designs and reality, providing clients and architects with a detailed, lifelike representation of their projects.

In conclusion, photorealistic rendering stands as a monumental shift in architectural visualization. It’s not just about creating pretty pictures; it’s a crucial tool that brings architectural concepts to life, aids in better decision-making, and fosters a deeper connection between the design and its audience.

If I were to leave you with a parting thought, it would be this: embrace this technology not just as a means to an end, but as an integral part of the architectural design process. It’s a canvas where your technical skills and creative vision can coalesce to produce something truly remarkable.

Benefits of 3D Modeling in Construction

In the dynamic field of construction, the constant quest for efficiency, accuracy, and innovation leads professionals to seek out the best tools and methods. Perhaps you’re grappling with the complexities of modern construction projects or seeking ways to improve your architectural endeavors.

The integration of 3D modeling has emerged as a pivotal solution, addressing a myriad of challenges faced in the construction and architecture sectors.

The benefits of 3D modeling in construction include enhanced visualization, improved design accuracy, easier modifications, and better stakeholder collaboration. This technology revolutionizes the way projects are conceived, planned, and executed, offering tangible advantages in efficiency, cost management, and client satisfaction.

As we delve into the myriad benefits of 3D modeling, you’ll discover how this technology is not just a tool, but a game-changer in the construction arena.

From facilitating complex structures to ensuring sustainable construction practices, this blog will guide you through the transformative impact of 3D modeling. Prepare to explore how embracing this technology can elevate your projects to new heights of success and efficiency.

13 Key Benefits of 3D Modeling in Construction/Architecture Space

1. Enhanced project visualization

Imagine walking through a building before it’s even built. That’s the magic of 3D modeling in construction. It allows you, the client or stakeholder, to see the end product in a virtual space.

This visualization is not just about the wow factor; it’s a practical tool. It helps in identifying potential design issues early on, saving time and resources. Plus, it’s an excellent way to get everyone on the same page about what the final structure will look like.

2. Design accuracy and planning

Accuracy is key in construction, and 3D modeling is like a GPS system guiding you to precision. It allows for meticulous planning and design, ensuring that every inch of the project is mapped out with precision.

This level of detail helps in avoiding costly mistakes and reworks. For instance, by using 3D models, architects and engineers can spot clashes between different systems, like plumbing and HVAC, before they become real problems on site.

3. Easy design modifications

Flexibility in design is another gem of 3D modeling. In my experience, I’ve found that making changes on a 3D model is infinitely easier and more cost-effective than revising physical plans.

It’s like working with digital clay; you can mold and adapt the design as you go. This adaptability is crucial, especially when dealing with complex projects or when a client requests changes after seeing the initial design.

4. Improved stakeholder collaboration

Collaboration is the backbone of any successful construction project. 3D modeling fosters a collaborative environment by providing a common visual language for everyone involved. Whether you’re an architect, engineer, contractor, or client, having a 3D model as a reference point makes communication clearer and more effective.

It bridges the gap between technical jargon and practical understanding, ensuring that everyone is on the same page.

5. Efficient project management

Efficient project management is like conducting an orchestra – everything needs to be in perfect harmony. 3D modeling plays a pivotal role here.

It enables project managers to track progress in real-time, foresee potential delays, and allocate resources more effectively. Imagine having a digital twin of your construction project that you can access anytime to make informed decisions.

6. Cost-effective resource use

In the world of construction, every penny counts. 3D modeling helps in optimizing the use of resources, translating to significant cost savings. By having a detailed model, you can accurately estimate the amount of materials needed, minimizing waste.

Plus, it aids in workforce allocation, ensuring that you have the right number of hands on deck at the right time. In essence, 3D modeling is not just a design tool; it’s a cost-saving strategy.

7. Reduced construction errors

Errors in construction can be costly and time-consuming. Thankfully, 3D modeling acts as a safeguard against such mishaps. By providing a detailed and scalable model of the project, it helps in identifying and rectifying errors before they manifest on the actual site.

This preemptive approach is crucial, especially in complex projects where the margin for error is slim. Think of 3D modeling as your project’s quality assurance expert.

8. Higher client satisfaction

At the end of the day, the goal is to make the client happy. 3D modeling significantly contributes to this by offering transparency and involving the client in the design process. Clients appreciate being able to see and understand the project through 3D models, which builds trust and satisfaction.

Moreover, the ability to make quick changes in the design based on client feedback enhances their experience and involvement. Happy clients often mean repeat business and good referrals, which are gold in the construction industry.

9. Facilitation of complex structures

3D modeling is a game-changer when it comes to constructing complex structures. It’s like having a roadmap for a labyrinth. Traditional 2D plans can make it challenging to visualize and execute intricate designs.

With 3D modeling, you get a comprehensive view of how every component fits together. This clarity is invaluable, especially for projects with unique architectural features or complicated structural elements. It’s like unlocking a new level of creative freedom while maintaining precision.

10. Sustainable construction

Sustainability is not just a buzzword; it’s a necessity. 3D modeling aids in creating eco-friendly structures by optimizing material usage and reducing waste. It also allows for better energy modeling and efficient design layouts that contribute to lower carbon footprints.

By utilizing 3D models, you’re not just building for today; you’re building responsibly for the future. It’s about making a positive impact on the environment through thoughtful construction practices.

11. Faster project completion

Time is of the essence in construction, and 3D modeling helps in beating the clock. By allowing for better planning and coordination, 3D models streamline the construction process.

This efficiency leads to faster project completion, which is a win for both the construction team and the client. It’s like having a fast-forward button for your construction projects, without compromising on quality or safety.

12. Integration with advanced tech

3D modeling isn’t just a standalone tool; it’s a gateway to integrating other advanced technologies. Think augmented reality (AR), virtual reality (VR), and building information modeling (BIM).

These integrations can take project visualization and execution to a whole new level, offering immersive and interactive experiences. This synergy of technologies is transforming the construction industry, making it more innovative and forward-thinking.

13. Compliance with standards

Last but not least, 3D modeling helps in ensuring compliance with industry standards and regulations. With detailed models, it’s easier to adhere to building codes and safety norms.

This compliance is crucial not just for the legality of the project but also for the safety and well-being of the end-users. In a way, 3D modeling acts as a guardian, ensuring that your project meets all necessary standards and best practices.

Conclusion

3D modeling in construction is a technological boon, offering enhanced visualization, precision in design, and improved collaboration, leading to efficient project management, cost savings, and client satisfaction.


To conclude, the adoption of 3D modeling in construction and architecture is not just a trend but a strategic move towards smarter, more efficient, and more sustainable building practices.

Whether it’s through improved visualization, precise resource management, or fostering better client relationships, the advantages of 3D modeling are clear and compelling.

As someone who has witnessed the transformative power of this technology first-hand, I can confidently say that integrating 3D modeling into your construction processes is a decision you’re unlikely to regret. It’s a step towards not just building structures, but crafting legacies that stand the test of time and efficiency.

360 Degree Virtual Tours

Meta title: Architectural Rendering | 360 degree virtual tours

If you’re delving into the world of “360 degree virtual tours in Architecture,” there’s a good chance you’re seeking innovative ways to showcase or understand architectural spaces. Perhaps you’re an architect looking to present your designs more effectively, or maybe you’re a client or student of architecture eager to explore structures in a detailed, immersive manner. This need for a deeper, more interactive engagement with architectural spaces is what brings you here.

360-degree virtual tours in architecture are interactive, immersive experiences that allow users to explore architectural designs and spaces virtually. These tours provide a comprehensive view of a space, combining technology and creativity to enhance understanding and engagement in architectural projects.

This blog post is packed with insights and information that will transform your understanding of 360-degree virtual tours in architecture. From the underlying technology to their practical applications, we’ll explore how these tours are revolutionizing the field.

Whether you’re a professional in the industry or simply have an interest in architecture, you’ll find valuable information that will deepen your appreciation and knowledge of these innovative tools. Stay tuned to discover how 360-degree virtual tours can benefit you and change the way you view architecture.

What is 360 Degree Virtual Tour

Imagine stepping into a space without actually being there. That’s what 360-degree virtual tours offer. These tours provide a spherical view of an environment, allowing you to look around in every direction as if you were physically present.

It’s like having a panoramic view at your fingertips, but even better. You’re not just looking at a scene; you’re immersing yourself in it.

How does this magic happen, you ask?

It’s all about advanced photography and software. A series of photographs or videos are taken from a single vantage point and then stitched together using specialized software.

This creates a seamless, spherical view that can be explored interactively on a computer or a VR headset.

Benefits of 360 Degree Virtual Tours in Architecture

Have you ever wondered how 360-degree virtual tours are revolutionizing the field of architecture? These tours are not just fancy, immersive photographs.

They are a powerful tool, allowing architects, clients, and stakeholders to explore a space without physically being there. Imagine wearing a VR headset and walking through a building that hasn’t even been built yet.

In my experience, clients love being involved in the design process, and 360-degree virtual tours make this incredibly easy. They offer a unique way for clients to engage with a project, providing a realistic sense of space and scale that traditional blueprints or 3D models can’t match.

Enhancing Design Visualization

From an architect’s perspective, these virtual tours are a game-changer. They allow us to spot potential design issues before they become real problems.

The level of detail is astonishing – you can virtually stand in a room and look around, getting a sense of how light falls at different times of the day or how the space flows.

Streamlining Communication and Feedback

With 360-degree virtual tours, it’s easier to communicate your vision to clients and team members.

This technology bridges the gap between technical architectural language and the client’s understanding. Feedback becomes more precise and actionable, saving time and reducing misunderstandings.

Cost-Effective Project Planning

Implementing 360-degree virtual tours can be surprisingly cost-effective in the long run. It reduces the need for physical models and frequent site visits, which not only saves money but also speeds up the decision-making process.

Step-by-Step Process of Creating a 360-degree tour

Step 1. Choosing the Right Equipment

The first step is all about getting the right tools for the job. You’ll need a 360-degree camera that can capture high-quality images from all angles. There’s a range of cameras available, from budget-friendly options to professional-grade equipment. Don’t forget a sturdy tripod too – stability is key for clear, seamless shots.

Step 2. Preparing the Space

Before you start snapping pictures, it’s crucial to prepare the space. This means cleaning and decluttering, ensuring each room looks its best. Lighting is also important; make sure each area is well-lit to avoid dark or unevenly lit spots in your tour.

Step 3. Capturing the Images

Place your camera in the center of the room, ensuring it’s level and at an appropriate height. You should capture images from multiple points within a space to give a comprehensive view. Remember, the more angles you cover, the more immersive the tour will be.

Step 4. Stitching the Images Together

Once you’ve captured all your images, it’s time to stitch them together. This is done using specialized software that seamlessly blends the edges of each image, creating a smooth, spherical panorama. It’s a bit like putting together a jigsaw puzzle, but with digital images.

Step 5. Adding Interactive Elements

To make your tour more engaging, consider adding interactive elements. This could be information hotspots, audio guides, or even links to related content. This step is about enhancing the user experience and providing more than just a visual tour.

Step 6. Testing and Refining

Always test your tour before releasing it. Walk through the tour yourself and see how it feels. Check for any glitches or areas that could be improved. A well-tested tour ensures a smooth, enjoyable experience for your audience.

Step 7. Publishing and Sharing

The final step is to publish and share your tour. This could be on your website, social media, or a dedicated virtual tour platform. Make sure it’s easy to access and compatible with different devices, so everyone can enjoy your creation.

Technology Behind 360 Degree Virtual Tours

Panoramic Photography Techniques

Panoramic photography is the cornerstone of creating 360-degree virtual tours. This technique involves capturing images in a wide, horizontal format. It’s not just about snapping a picture; it’s an art form.

The photographer must carefully choose the right vantage points, ensuring that each image covers a wide field of view with minimal distortion. Overlapping these images just right is crucial for a seamless panoramic view. It’s like painting a canvas, but with a camera.

Software for Tour Creation

Once the images are captured, they need to be stitched together, and this is where specialized software comes in. There are many options available, each with its own set of features.

Some are user-friendly for beginners, while others offer advanced functionalities for professionals. The right software can make or break a virtual tour. It’s like the glue that holds all your images together, transforming them into a cohesive, navigable space.

Virtual Reality (VR) Integration

Virtual reality takes 360-degree tours to the next level. By integrating VR, users can immerse themselves completely in the virtual space.

It’s not just viewing; it’s experiencing. With a VR headset, you can look around as if you were actually in the space, making the experience incredibly realistic.

This technology is rapidly evolving, and its integration into virtual tours is a game-changer, especially in fields like architecture and real estate.

360 Degree Camera Technology

The heart of a 360-degree virtual tour is the camera technology. These cameras are specially designed to capture images in 360 degrees. They come equipped with multiple lenses that cover all angles, ensuring that every corner of the space is captured.

The technology behind these cameras is constantly advancing, offering higher resolution, better image stabilization, and more seamless integration with software and VR.

In my experience, investing in a good quality 360-degree camera is crucial for producing professional-grade virtual tours.

Conclusion

360-degree virtual tours in architecture offer a unique, immersive way to experience and understand architectural spaces. They combine panoramic photography, sophisticated software, and sometimes virtual reality, to create interactive tours that are revolutionizing the field.


In conclusion, 360-degree virtual tours represent a significant leap in architectural visualization and presentation. They not only offer architects and clients an immersive way to explore and understand spaces but also foster a deeper appreciation of architectural design.

For anyone involved in architecture, whether as a professional or an enthusiast, embracing these tours is stepping into a future where technology enhances our interaction with and understanding of spaces.

3D Virtual House Tours

In the fast-paced world of real estate, you’re likely seeking efficient and innovative ways to explore properties. This is where “3D Virtual House Tours” come into play. With geographical barriers and time constraints, physically touring every potential home is not always feasible. This challenge has sparked a growing interest in virtual house tours, offering a practical solution to these limitations.

3D virtual house tours are immersive, digital walkthroughs of properties, offering a realistic and interactive experience from the comfort of your home. They provide a detailed view of every room, allowing you to explore a property at your own pace and convenience.

You’re about to dive into a blog that unpacks everything about 3D Virtual House Tours. From understanding what they are and the technology behind them, to learning how to create one and exploring their benefits, this guide has it all.

If you’re a buyer, a realtor, or just a tech enthusiast, this blog will not only inform you about this revolutionary tool but also illustrate how it can be a game-changer in your property search or sale process.

What are 3D Virtual House Tours?

A 3D virtual house tour is an immersive, digital walkthrough of a property. It’s a far cry from traditional slideshows or video tours.

Here, you, the viewer, are in control. You can explore the property at your own pace, choosing which room to enter, which angle to view, even peering out of windows to check the view. It’s like a video game where the objective is to discover your potential new home!

The beauty of these tours lies in their detail. You get a 360-degree view of each room, and with some platforms, information hotspots are embedded within the tour. Clicking on these hotspots can reveal details like the type of countertops in the kitchen or the brand of the fireplace in the living room.

Now, you might be wondering, “How realistic are these tours?” Well, let me tell you, with advancements in 3D technology, they’re incredibly lifelike.

Personal Experience: During a recent personal experience, I took a virtual tour of a home in Spain. The clarity and depth was so precise that I could notice the texture of the wooden flooring and the gloss on the kitchen tiles. It was almost as good as being there in person!

How to Create a 3D Virtual House Tour

Creating a 3D virtual house tour might seem like a task for professionals, but with the right tools and a bit of know-how, it’s something you can do too. Whether you’re a realtor looking to showcase a property or a homeowner wanting to document your space, this guide will walk you through the process.

Step 1: Gather the Necessary Equipment

First things first, you’ll need a 3D camera. There are several models on the market specifically designed for creating virtual tours. These cameras capture high-quality images from multiple angles, essential for creating a realistic 3D space. Don’t forget a tripod for stability and consistent height throughout the shoot.

Step 2: Prepare the Property

Before you start capturing images, the property needs to be in tip-top shape. This means decluttering, cleaning, and staging each room to look its best. Remember, the camera captures everything, so attention to detail is key. Open curtains to let natural light in and ensure all lights are working – good lighting makes a significant difference.

Step 3: Capturing the Images

Now, it’s time to start capturing images. Start from the front door and work your way through the property, ensuring you cover every angle. The goal is to create a flow that mimics how someone would naturally move through the space. It’s crucial to maintain a consistent height and distance from walls for a uniform look.

Step 4: Processing and Stitching

Once you have all your images, it’s time to stitch them together. This can be done using specialized software that aligns and merges the images to create the 3D tour. Some 3D cameras come with their own software, or you can choose one from various available options. This step might seem technical, but most software is user-friendly, with plenty of tutorials available.

Step 5: Adding Interactive Elements

To enhance the virtual tour, add interactive elements like informational hotspots, navigational arrows, and labels. This step is where you can get creative – think about what information a potential buyer or viewer would find helpful and include it.

Step 6: Publishing and Sharing

After perfecting your tour, it’s time to share it with the world. You can upload it to a real estate listing, embed it on a website, or share it directly with clients. Ensure that the platform you choose supports 3D virtual tours and offers a smooth viewing experience.

Technology Behind 3D Virtual Tours

3D Cameras

When you dive into a 3D virtual house tour, the first thing that strikes you is the lifelike quality of the imagery. This realism is courtesy of advanced 3D cameras. These aren’t your everyday photography tools. They’re equipped with multiple lenses and sensors, capturing every angle of a room to create a seamless, three-dimensional space.

The process, known as photogrammetry, involves stitching together numerous high-resolution images to form a comprehensive 3D model. It’s like piecing together a jigsaw puzzle, but the end result is a fully navigable digital twin of the property.

Software

While 3D cameras capture the visuals, it’s the software that brings these tours to life. Sophisticated software platforms process the raw images, creating a fluid, interactive experience.

These platforms are the backbone of 3D virtual tours, allowing for features like navigational arrows, informational hotspots, and even virtual staging. This software often utilizes cloud computing, ensuring that these data-intensive tours are easily accessible over the internet without any lag. It’s a blend of art and technology, transforming raw data into an engaging digital experience.

Virtual Reality

The next layer of the technology behind 3D virtual tours is virtual reality (VR). By strapping on a VR headset, you can step into a home as if you were actually there. The immersive experience VR provides is unparalleled.

You can look around by simply turning your head, walk through the house by navigating with controllers, and even interact with elements in the virtual space. It’s a game-changer, especially for remote property viewing, and the closest thing to an in-person visit.

User Interface: Simplicity Meets Functionality

An often overlooked but crucial aspect of these tours is the user interface (UI). A well-designed UI makes navigating a 3D virtual tour intuitive and enjoyable. It includes elements like floor plan views, room labels, and easy-to-use navigation tools.

The goal is to make the experience as user-friendly as possible. After all, the best technology is the one you don’t notice because it works so seamlessly.

Role of Artificial Intelligence

AI algorithms are beginning to aid in the processing of images, making the creation of 3D models faster and more accurate.

They can also personalize the viewing experience based on user preferences and behavior. Imagine a tour that adapts to show you more of what you like – that’s the potential AI holds.

Benefits of 3D Virtual House Tours


In the realm of real estate, 3D virtual house tours have become a game-changer. They’re not just a flashy tech gimmick; they offer tangible benefits that can transform the way properties are marketed and viewed. Let’s dive into some of these benefits.

Accessibility and Convenience

One of the most significant advantages of 3D virtual tours is their accessibility. Potential buyers can explore properties from anywhere in the world, at any time. There’s no need to schedule appointments or travel long distances.

This ease of access is particularly beneficial for international or out-of-state buyers. It’s like having an open house available 24/7, without the need for the homeowner to vacate the property or for the realtor to be present.

Detailed and Interactive Viewing Experience

Unlike traditional photos or videos, 3D virtual tours offer a more detailed and interactive experience. Viewers can navigate through the property at their own pace, focusing on areas of interest.

They can explore rooms from different angles and get a realistic sense of the space and layout. This level of detail helps potential buyers form a more accurate and vivid impression of the property.

Saving Time and Resources

From a practical standpoint, 3D virtual tours can be a huge time-saver. For realtors, it means less time spent on conducting in-person tours for every interested party.

For buyers, it reduces the time spent visiting properties that might not meet their expectations. This efficiency is not just a convenience; it translates into cost savings and a more streamlined property hunting process.

Enhanced Marketing Potential

3D virtual tours are a powerful marketing tool. They can make a listing stand out and attract more attention. By offering an immersive experience, these tours can generate a stronger emotional connection than standard photographs.

Reducing the Physical Footprint

In today’s environmentally conscious world, reducing the carbon footprint is increasingly important. 3D virtual tours contribute to this by cutting down the need for physical travel to view properties.

Fewer car trips not only save time but also reduce emissions, aligning with a more sustainable approach to property viewing.

Attracting a Wider Audience

Finally, 3D virtual tours have the potential to reach a wider audience. They can be shared easily on social media, real estate websites, and via email.

This wide reach is especially beneficial for unique or high-end properties that might appeal to a niche market. By casting a wider net, sellers and realtors can find the right buyer more efficiently.

Conclusion

3D virtual house tours are a transformative tool in real estate, offering detailed, convenient, and immersive property viewings. They enhance the buying and selling experience by breaking down geographical barriers and saving time.


As we reach the end of this exploration into 3D Virtual House Tours, it’s clear that they represent much more than just technological innovation.

They are a new lens through which we can view and interact with properties, blending convenience with comprehensive detail. For anyone involved in real estate, whether you’re buying, selling, or simply exploring, these tours are an invaluable asset.

They empower decision-making with a clarity and ease that was previously unattainable. As we move forward in an increasingly digital world, embracing and leveraging the power of 3D virtual house tours could very well be the key to unlocking new possibilities in property exploration and transaction.

Frequently Asked Questions (3D Virtual House Tours)

What is 3D virtual house tours?

3D virtual house tours are immersive digital simulations of real estate properties. Created using advanced 3D photography and software, they allow users to explore properties virtually, offering a realistic, interactive experience that mimics an in-person visit, accessible through computers or mobile devices.

What are the advantages of 3D virtual tours?

The primary advantages of 3D virtual tours include greater accessibility, enhanced convenience, significant time savings, and expanded market reach. They provide a detailed, interactive property viewing experience, surpassing traditional static images or video tours, and are particularly beneficial for remote or international buyers.

How to do a virtual tour of your home?

Creating a virtual tour of your home involves using a 3D camera to capture detailed images of the property, which are then stitched together using specialized software to create an interactive, navigable digital tour. This process allows homeowners to showcase their property in a comprehensive and immersive manner.

What is Matterport 3D virtual tour?

Matterport 3D virtual tour is a state-of-the-art technology used for creating highly detailed and realistic virtual representations of physical spaces. Utilizing specialized cameras and software, it provides an immersive, interactive experience, making it a popular choice in real estate for its lifelike and engaging virtual tours.

3D Rendering of House Plans

If you’re delving into the realm of 3D rendering for house plans, it’s likely because you understand that traditional 2D blueprints, while essential, don’t fully capture the essence of a finished home. You’re seeking a more vivid, tangible way to visualize and communicate architectural designs, a way to see the future home in all its dimensional glory before a single brick is laid.

3D rendering of house plans translates two-dimensional architectural drawings into realistic, three-dimensional visualizations, offering a detailed and immersive view of a future home. This process helps in better understanding space, layout, and design elements, significantly aiding in decision-making and client presentations.

In this blog, you’ll discover the intricacies of converting 2D house plans into stunning 3D models, the various software tools used, the step-by-step rendering process, and the challenges faced in this domain. Whether you’re a professional architect, a student, or a homeowner planning your dream house, this guide will provide valuable insights into making the most of 3D rendering.

From House Plans to 3D Models

Transforming traditional house plans into stunning 3D models is an exciting journey, blending the precision of architecture with the flair of visual design. Let’s explore this transformative process.

Before diving into the world of 3D, it’s crucial to grasp the essence of traditional house plans. These are usually two-dimensional, detailed drawings showing the layout of a house from a bird’s-eye view.

They encompass floor plans, room sizes, and other architectural elements. As a foundational step, understanding these plans is key to a successful 3D rendering.

Now, let’s talk about the transition from 2D to 3D. This is where technology waltzes in, taking a flat, monochrome plan and breathing life into it. Software tools play a pivotal role here.

They interpret the lines and measurements of a 2D plan, constructing it into a three-dimensional space.

The true beauty of 3D modeling lies in the details. Adding textures, colors, and materials transforms a basic model into a realistic representation of a future home. This step requires a keen eye for design and an understanding of how different materials interact with light and space.

Creating a 3D model is one thing, but presenting it effectively is another. Visualization techniques like lighting, shadows, and camera angles can dramatically affect how your model is perceived.

It’s not just about showing a structure; it’s about telling a story. Good lighting can highlight the best features of your design, while camera angles can showcase the layout and flow of space.

3D Rendering Softwares for House Plan

Selecting the right 3D rendering software is a pivotal decision in the journey of transforming house plans into vivid, realistic models. Let’s explore some of the leading tools in this domain, each with its unique strengths.

Autodesk 3ds Max

When it comes to high-end architectural renderings, Autodesk 3ds Max stands out. Known for its detailed modeling capabilities, this software is a powerhouse for creating intricate and realistic 3D models.

It’s particularly favored for its advanced lighting and shading options, which can bring any interior or exterior space to life with striking realism.

SketchUp

If you’re new to the world of 3D rendering, SketchUp is your friendly neighbor. Its intuitive interface makes it incredibly accessible for beginners. But don’t be fooled by its simplicity;

SketchUp is robust enough to handle complex architectural designs. It’s also backed by a vast library of models and textures, which can significantly speed up your workflow.

Revit

Revit, another gem from Autodesk, is tailored more towards architects and designers focusing on building information modeling (BIM). What sets Revit apart is its ability to create coherent and interconnected models.

Changes made in one view update across all views, ensuring consistency and accuracy in your designs. It’s a game-changer for collaborative projects and large-scale architectural endeavors.

Rhino 3D

Rhino 3D steps in when you’re dealing with complex geometries and non-standard shapes. Renowned for its mathematical precision in model creation, Rhino is the go-to for architects who love to push the boundaries of traditional design.

Its compatibility with numerous design, drafting, CAM, engineering, and analysis software makes it a versatile tool in a multi-software workflow.

Cinema 4D

Dipping into the realm of motion, Cinema 4D is perfect for architects who want to add an extra flair to their presentations with animations.

Known for its ease of use in the world of motion graphics, it allows you to create stunning walkthroughs of your 3D models, adding a dynamic layer to your presentations.

Step by Step Rendering Process for House Plan

Transforming a house plan into a 3D rendering is like taking a journey from a sketch to a lifelike model. Let’s walk through this process step by step, unveiling how each stage contributes to creating a stunning visual representation of a house plan.

Step 1: Gathering and Preparing Your Resources

Before diving into the digital world, you need to gather all your resources. This includes the house plan, any reference images, and specific details about materials and textures.

Preparing these resources ensures that you have a clear roadmap for your rendering process.

Step 2: Modeling the Basic Structure

The first digital step is to create the basic structure of your house. This involves translating the 2D floor plan into a 3D model. Whether you’re using SketchUp, Revit, or any other software, this is where you set the foundation, shaping walls, floors, roofs, and other structural elements. Precision is key in this step to ensure accuracy in the overall model.

Step 3: Adding Textures and Materials

Once the basic structure is in place, it’s time to breathe life into it with textures and materials. This is where you apply brick textures to walls, wooden finishes to floors, and so forth. Choosing the right textures can significantly enhance the realism of your model.

It’s a creative process, but also one that demands attention to detail and an understanding of how materials interact with light.

Step 4: Incorporating Furniture and Decor

No house is complete without furniture and decor. This step involves populating your 3D model with furniture, fixtures, and other decorative elements. This is where you get to add personality and style to the space. It’s also a chance to experiment with different layouts and design themes.

Step 5: Setting Up Lighting

Lighting can make or break your 3D rendering. Proper lighting highlights the best features of your design and adds depth and atmosphere to the space.

You’ll need to consider both natural and artificial light sources, ensuring they accurately reflect how the space will look at different times of the day.

Step 6: Final Rendering

Now, it’s time for the final rendering. This is where your model gets processed into a high-quality image or animation.

Depending on the complexity and desired quality, this step can take anywhere from minutes to hours. It’s a waiting game, but seeing your vision come to life is incredibly rewarding.

3D Rendering Challenges in Architecture Space

Navigating the intricate world of 3D rendering in architecture comes with its set of challenges. Understanding these hurdles is crucial for anyone stepping into this realm, whether you’re a seasoned professional or a budding designer.

Balancing Realism and Resources

One of the biggest challenges in 3D rendering is striking the right balance between realism and the resources at your disposal.

High levels of detail can lead to stunning visualizations, but they also demand more time, processing power, and expertise. It’s a delicate balancing act, where you must align your vision with practical constraints.

Ensuring Accuracy and Consistency

Accuracy and consistency are the backbones of architectural rendering. A minor discrepancy between the render and the actual plan can lead to significant issues down the line.

This means constantly cross-checking your model with the original plans and specifications, a meticulous and sometimes tedious process.

Managing Client Expectations

Clients often have high expectations from 3D renders, sometimes expecting photo-realistic outcomes.

However, achieving such levels of realism isn’t always feasible within the constraints of time and budget. Clear communication and managing expectations from the start can help mitigate this challenge.

Navigating Software Complexity

The complexity of 3D rendering software can be daunting. Each tool comes with its learning curve, and staying updated with new features and techniques is a continuous process.

For beginners, this complexity can be overwhelming, but patience and practice are key.

Dealing with Hardware Limitations

High-quality 3D rendering requires robust hardware. Unfortunately, not everyone has access to high-end computing power.

This limitation can affect the quality and speed of your renders, making it a significant challenge for many architects and designers, especially those just starting out or working with limited budgets.

Coping with Long Rendering Times

Rendering, especially at high qualities, can be time-consuming. This wait can be frustrating and can slow down the overall project timeline.

Efficient workflow management and realistic scheduling are essential to mitigate the impact of long rendering times.

Frequently Asked Questions (3D Rendering of House Plans)

How much does it cost to 3D model a house?

The cost of 3D modeling a house varies widely, typically ranging from $500 to $4,500, depending on the project’s complexity, detail level, and the professional’s expertise. The cost factor is influenced by several elements, including the size of the house, the level of detail required in the model, and the experience of the 3D artist or firm.

More complex projects with intricate details or those requiring high-end rendering techniques will be at the higher end of the cost spectrum. It’s always advisable to get quotes from different professionals to find a balance between quality and budget.

Is there an app to convert floor plan to 3D?

Yes, there are apps available that can convert floor plans to 3D models. Popular choices include SketchUp, Floorplanner, and Homestyler. These apps vary in functionality and complexity. Some, like SketchUp, offer detailed modeling capabilities suited for professionals, while others like Floorplanner and Homestyler are more user-friendly, catering to homeowners and DIY enthusiasts.

These apps allow users to input floor plans and then transform them into 3D models, offering a virtual walkthrough of the space.

How to create 3D house plans?

Creating 3D house plans typically involves using specialized software like SketchUp, Revit, or AutoCAD to transform 2D floor plans into three-dimensional models. The process starts with importing or drawing the 2D floor plan in the software. Then, you’ll use various tools within the software to build walls, add floors, and insert architectural elements like doors and windows.

The final step involves adding textures, colors, and furnishings to bring the house plan to life. It’s a skill that requires practice, but many online tutorials can guide beginners through the process.

How much does a 3D floor plan cost?

The cost of a 3D floor plan can range from $250 to $750 per floor, depending on the complexity and the level of detail required. This price variation depends on factors such as the size of the property, the number of rooms, and the inclusion of furnishings and details.

Customization, like unique textures or furniture designs, can also affect the price. As with any service, it’s beneficial to compare offerings from different providers to ensure you receive a fair price for the quality of work you expect.

3D Modeling and Rendering in Architecture

If you’re venturing into architecture, you’ve probably realized the importance of 3D modeling and rendering. It’s a game-changer in the field, bringing designs to life and changing how projects are presented. It’s essential for architects, students, and enthusiasts alike to get a grip on this tech to stay ahead in this ever-evolving industry.

3D modeling and rendering in architecture are essential for visualizing designs before construction, allowing for adjustments and improvements. This process enhances client understanding, saves time and resources, and facilitates better design decisions.

The journey through this blog will unfold the intricacies of 3D modeling and rendering in architecture. You’ll discover how these tools bring designs to life, the impact they have on the architectural process, and why they are indispensable in modern architecture.

Fundamentals of 3D Modeling

3D modeling is the process of creating a mathematical representation of any three-dimensional surface or object via specialized software.

It’s like sculpting, but in the digital world. Imagine you’re a sculptor, but instead of clay or marble, your material is pixels and your tools are algorithms.

Types of 3D Models

There are primarily two types of 3D models: solid and surface models. Solid models define the volume of the object they represent and are more realistic, but also more complex. They’re like the bones and flesh of a building, providing a complete view from every angle.


On the other hand, surface models are more like the skin, representing only the surface of an object. These are often used in applications where internal details are less important, like in video games or movies.


In architecture, solid models are paramount. They allow you not only to visualize the exterior of a building but also to delve deep into the intricacies of its interior. It’s like having X-ray vision, where you can see the load-bearing structures or the HVAC system as easily as the façade.

Popular 3D Modeling Softwares

When it comes to choosing the right software, the plethora is both a blessing and a maze. Some of the most popular 3D modeling software in architecture include AutoCAD, SketchUp, and Revit. Each has its unique strengths.


  • AutoCAD, a veteran in the field, is known for its precision and is widely used for technical drawings.
  • It’s like the Swiss Army knife of 3D modeling – reliable and versatile.
  • SketchUp, meanwhile, is more intuitive and user-friendly, making it a favorite for beginners or those looking to quickly bring their ideas to life.

From my personal experience, Revit stands out for architectural 3D modeling. It’s not just about creating standalone models; it’s about creating intelligent, interconnected systems that reflect how buildings truly come together.

Imagine constructing a digital twin of a building where every element is in sync, from the architectural design to the electrical systems.

3D Rendering: What is it and how does it work?

Imagine you’re a painter, and you’ve just finished sketching the outline of a beautiful landscape. Now, it’s time to bring it to life with colors, textures, and lighting. This is what 3D rendering is to the world of architecture and design.

It’s the process of adding lifelike qualities to a 3D model, transforming it from a wireframe into a vibrant, realistic image. This magic happens through rendering software, which uses complex algorithms to simulate light, shadows, textures, and other physical properties.

Rendering Process

The rendering process is a fascinating journey from model to masterpiece. It begins with your 3D model. The software then layers this skeleton with textures, resembling the materials you’d see in real life, like brick, glass, or wood.

The final step is lighting, which breathes life into the model. It’s like the sun rising, casting light and shadows, and revealing the full glory of the landscape.


But it’s not just about slapping on textures and lights. The rendering process is both an art and a science. It requires an understanding of how materials interact with light, how textures convey emotion, and how the right angle can tell a story.

Real-time vs. Pre-rendering

Real-time rendering, as the name suggests, happens in, well, real time. It’s the technology behind video games and virtual reality, where the images are rendered on the fly as you interact with the environment. It’s like improvisational theater, where the performance changes based on the audience’s reactions.

Pre-rendering, on the other hand, is like a meticulously planned Broadway show. Every detail is crafted in advance, allowing for higher quality and more complex effects. This method is often used in architecture and film, where each frame can take hours to render, but the result is a visual feast, rich in detail and realism.

Lighting and Texturing in Rendering

Lighting in rendering is what makes or breaks the realism of your architectural visualization. It’s about understanding how light behaves – how it bounces off surfaces, creates shadows, and sets the mood.

Texturing, on the other hand, is about giving surfaces a sense of touch and feel. It’s the difference between looking at a brick wall and feeling its roughness in your mind.


Differences between 3D modeling and 3D rendering.

Differences between 3D modeling and 3D rendering is like differentiating between the architect who designs a building and the painter who brings it to life with color and texture.

Both are essential in the creation of architectural masterpieces, yet their roles, tools, and outcomes are distinct.

Purpose

The purpose of 3D modeling is to create a digital skeleton of an object. It’s the process of constructing the form, dimensions, and structure, much like an architect drawing up blueprints.

In contrast, 3D rendering is about bringing this model to life. It’s like the stage where a painter adds colors, textures, and lighting to a sketch, transforming it into a vivid, realistic image.

Tools and Techniques

For 3D modeling, tools like AutoCAD, SketchUp, and Revit are often used. They allow architects and designers to build precise, detailed models. Techniques involve creating wireframes, adding geometrical shapes, and defining dimensions.

3D rendering, however, relies on software like V-Ray or Lumion, which focus on adding realistic lighting, shadows, and textures. The techniques are more about visual effects and photorealism, like choosing the right angle of sunlight or the texture of brick walls.

Application in the Design Process

3D modeling is the first step in the architectural design process. It’s where you flesh out the dimensions and spatial relationships of a building. 3D rendering, on the other hand, comes later. It’s used to create compelling visuals to convey the final look of the project.

It helps in showcasing the design to clients or stakeholders, providing them with a tangible, realistic view of the end product.

Output and Visualization

The output of 3D modeling is a digital model – a representation of the structure in three dimensions. It’s like looking at a digital clay model of a building. The output of 3D rendering, however, is a lifelike image or animation.

It’s akin to viewing a photograph of the finished building, complete with textures, colors, and lighting that evoke emotions and give a sense of realism.

Time and Resource Investment

3D modeling can be relatively quick, depending on the project’s complexity. It’s about building the structure, which can be straightforward for experienced designers. Rendering, though, is more resource intensive.

It requires powerful hardware and more time, especially for high-quality outputs. The level of detail in lighting and texturing can turn rendering into a time-consuming process.

Which is better 3D Modeling or 3D rendering for Architecture?

When it comes to architecture, the debate between the supremacy of 3D modeling and 3D rendering is like comparing the importance of a hammer to a paintbrush in building a house. Both are indispensable tools in the architectural process, each serving its unique purpose and complementing the other.

Impact on Client Presentation

When presenting to clients or stakeholders, 3D rendering often takes the front seat. It’s the tool that helps people without technical architectural knowledge to visualize the final project. A beautifully rendered image or animation can evoke emotions and excitement, making it a powerful tool for winning pitches and getting project approvals.


3D modeling, while less glamorous in presentations, is crucial for making accurate and informed decisions during the design process. It’s more about function than form, but without it, the form might not stand up to real-world constraints.

Technical Requirements and Skills

3D modeling demands a strong understanding of architectural principles, mathematics, and spatial awareness. It’s a skill that requires precision and attention to detail. Rendering, on the other hand, requires an artistic touch, an understanding of lighting, texture, and color theory. It’s more about creating a mood and less about structural accuracy.

Integration in the Architectural Workflow

In the workflow of an architectural project, 3D modeling and rendering play different, but equally important roles. Modeling is a continuous process that evolves through the design phase, constantly adapting to new information and changes in the project.

Rendering, while it can occur at various stages, is often most impactful in the final stages, where it’s used to showcase the completed design in its best light.

Conclusion

3D modeling and rendering stand as crucial tools. They transform abstract ideas into vivid, tangible representations, significantly improving communication between architects and clients, and elevating the overall quality and efficiency of architectural projects.

As we wrap up, it’s clear that 3D modeling and rendering are more than just digital tools; they are the bridge between an architect’s vision and the client’s understanding.

They empower architects to explore creative realms, ensuring that every angle, texture, and light in a design is as close to reality as possible. Embracing these technologies will not only improve your designs but also elevate your architectural storytelling.

Frequently Asked Questions (3D Modeling and Rendering in Architecture)

What is architectural 3D rendering?

Architectural 3D rendering is the process of creating two-dimensional images or animations showing the attributes of a proposed architectural design. These images are generated using 3D software, showcasing the design’s realistic aspects, such as textures, lighting, and materials.

What is 3D modeling and rendering?

3D modeling and rendering in architecture involve creating a digital model of a structure and then producing realistic images or animations from it. This process allows architects to visualize and refine buildings before they are constructed.

What is 3D model in architecture?

A 3D model in architecture is a digital representation of a building or structure, constructed within a three-dimensional framework. It allows architects to explore design elements in a virtual space, offering a detailed view of the project.

What are the 4 types of architectural rendering?

Photorealistic rendering creates detailed, life-like images, while conceptual rendering emphasizes ideas with less detail. Walkthroughs are animated videos that showcase a design, and virtual tours offer an interactive 3D exploration of a space, enhancing client presentations with immersive experiences.