If you’re delving into the realm of 3D rendering for house plans, it’s likely because you understand that traditional 2D blueprints, while essential, don’t fully capture the essence of a finished home. You’re seeking a more vivid, tangible way to visualize and communicate architectural designs, a way to see the future home in all its dimensional glory before a single brick is laid.
3D rendering of house plans translates two-dimensional architectural drawings into realistic, three-dimensional visualizations, offering a detailed and immersive view of a future home. This process helps in better understanding space, layout, and design elements, significantly aiding in decision-making and client presentations.
In this blog, you’ll discover the intricacies of converting 2D house plans into stunning 3D models, the various software tools used, the step-by-step rendering process, and the challenges faced in this domain. Whether you’re a professional architect, a student, or a homeowner planning your dream house, this guide will provide valuable insights into making the most of 3D rendering.
From House Plans to 3D Models

Transforming traditional house plans into stunning 3D models is an exciting journey, blending the precision of architecture with the flair of visual design. Let’s explore this transformative process.
Before diving into the world of 3D, it’s crucial to grasp the essence of traditional house plans. These are usually two-dimensional, detailed drawings showing the layout of a house from a bird’s-eye view.
They encompass floor plans, room sizes, and other architectural elements. As a foundational step, understanding these plans is key to a successful 3D rendering.
Now, let’s talk about the transition from 2D to 3D. This is where technology waltzes in, taking a flat, monochrome plan and breathing life into it. Software tools play a pivotal role here.
They interpret the lines and measurements of a 2D plan, constructing it into a three-dimensional space.
The true beauty of 3D modeling lies in the details. Adding textures, colors, and materials transforms a basic model into a realistic representation of a future home. This step requires a keen eye for design and an understanding of how different materials interact with light and space.
Creating a 3D model is one thing, but presenting it effectively is another. Visualization techniques like lighting, shadows, and camera angles can dramatically affect how your model is perceived.
It’s not just about showing a structure; it’s about telling a story. Good lighting can highlight the best features of your design, while camera angles can showcase the layout and flow of space.
3D Rendering Softwares for House Plan
Selecting the right 3D rendering software is a pivotal decision in the journey of transforming house plans into vivid, realistic models. Let’s explore some of the leading tools in this domain, each with its unique strengths.
Autodesk 3ds Max
When it comes to high-end architectural renderings, Autodesk 3ds Max stands out. Known for its detailed modeling capabilities, this software is a powerhouse for creating intricate and realistic 3D models.
It’s particularly favored for its advanced lighting and shading options, which can bring any interior or exterior space to life with striking realism.
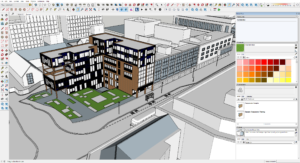
SketchUp
If you’re new to the world of 3D rendering, SketchUp is your friendly neighbor. Its intuitive interface makes it incredibly accessible for beginners. But don’t be fooled by its simplicity;
SketchUp is robust enough to handle complex architectural designs. It’s also backed by a vast library of models and textures, which can significantly speed up your workflow.
Revit
Revit, another gem from Autodesk, is tailored more towards architects and designers focusing on building information modeling (BIM). What sets Revit apart is its ability to create coherent and interconnected models.
Changes made in one view update across all views, ensuring consistency and accuracy in your designs. It’s a game-changer for collaborative projects and large-scale architectural endeavors.
Rhino 3D
Rhino 3D steps in when you’re dealing with complex geometries and non-standard shapes. Renowned for its mathematical precision in model creation, Rhino is the go-to for architects who love to push the boundaries of traditional design.
Its compatibility with numerous design, drafting, CAM, engineering, and analysis software makes it a versatile tool in a multi-software workflow.
Cinema 4D
Dipping into the realm of motion, Cinema 4D is perfect for architects who want to add an extra flair to their presentations with animations.
Known for its ease of use in the world of motion graphics, it allows you to create stunning walkthroughs of your 3D models, adding a dynamic layer to your presentations.
Step by Step Rendering Process for House Plan

Transforming a house plan into a 3D rendering is like taking a journey from a sketch to a lifelike model. Let’s walk through this process step by step, unveiling how each stage contributes to creating a stunning visual representation of a house plan.
Step 1: Gathering and Preparing Your Resources
Before diving into the digital world, you need to gather all your resources. This includes the house plan, any reference images, and specific details about materials and textures.
Preparing these resources ensures that you have a clear roadmap for your rendering process.
Step 2: Modeling the Basic Structure
The first digital step is to create the basic structure of your house. This involves translating the 2D floor plan into a 3D model. Whether you’re using SketchUp, Revit, or any other software, this is where you set the foundation, shaping walls, floors, roofs, and other structural elements. Precision is key in this step to ensure accuracy in the overall model.
Step 3: Adding Textures and Materials
Once the basic structure is in place, it’s time to breathe life into it with textures and materials. This is where you apply brick textures to walls, wooden finishes to floors, and so forth. Choosing the right textures can significantly enhance the realism of your model.
It’s a creative process, but also one that demands attention to detail and an understanding of how materials interact with light.
Step 4: Incorporating Furniture and Decor
No house is complete without furniture and decor. This step involves populating your 3D model with furniture, fixtures, and other decorative elements. This is where you get to add personality and style to the space. It’s also a chance to experiment with different layouts and design themes.
Step 5: Setting Up Lighting
Lighting can make or break your 3D rendering. Proper lighting highlights the best features of your design and adds depth and atmosphere to the space.
You’ll need to consider both natural and artificial light sources, ensuring they accurately reflect how the space will look at different times of the day.
Step 6: Final Rendering
Now, it’s time for the final rendering. This is where your model gets processed into a high-quality image or animation.
Depending on the complexity and desired quality, this step can take anywhere from minutes to hours. It’s a waiting game, but seeing your vision come to life is incredibly rewarding.
3D Rendering Challenges in Architecture Space

Navigating the intricate world of 3D rendering in architecture comes with its set of challenges. Understanding these hurdles is crucial for anyone stepping into this realm, whether you’re a seasoned professional or a budding designer.
Balancing Realism and Resources
One of the biggest challenges in 3D rendering is striking the right balance between realism and the resources at your disposal.
High levels of detail can lead to stunning visualizations, but they also demand more time, processing power, and expertise. It’s a delicate balancing act, where you must align your vision with practical constraints.
Ensuring Accuracy and Consistency
Accuracy and consistency are the backbones of architectural rendering. A minor discrepancy between the render and the actual plan can lead to significant issues down the line.
This means constantly cross-checking your model with the original plans and specifications, a meticulous and sometimes tedious process.
Managing Client Expectations
Clients often have high expectations from 3D renders, sometimes expecting photo-realistic outcomes.
However, achieving such levels of realism isn’t always feasible within the constraints of time and budget. Clear communication and managing expectations from the start can help mitigate this challenge.
Navigating Software Complexity
The complexity of 3D rendering software can be daunting. Each tool comes with its learning curve, and staying updated with new features and techniques is a continuous process.
For beginners, this complexity can be overwhelming, but patience and practice are key.
Dealing with Hardware Limitations
High-quality 3D rendering requires robust hardware. Unfortunately, not everyone has access to high-end computing power.
This limitation can affect the quality and speed of your renders, making it a significant challenge for many architects and designers, especially those just starting out or working with limited budgets.
Coping with Long Rendering Times
Rendering, especially at high qualities, can be time-consuming. This wait can be frustrating and can slow down the overall project timeline.
Efficient workflow management and realistic scheduling are essential to mitigate the impact of long rendering times.
Frequently Asked Questions (3D Rendering of House Plans)
How much does it cost to 3D model a house?
The cost of 3D modeling a house varies widely, typically ranging from $500 to $4,500, depending on the project’s complexity, detail level, and the professional’s expertise. The cost factor is influenced by several elements, including the size of the house, the level of detail required in the model, and the experience of the 3D artist or firm.
More complex projects with intricate details or those requiring high-end rendering techniques will be at the higher end of the cost spectrum. It’s always advisable to get quotes from different professionals to find a balance between quality and budget.
Is there an app to convert floor plan to 3D?
Yes, there are apps available that can convert floor plans to 3D models. Popular choices include SketchUp, Floorplanner, and Homestyler. These apps vary in functionality and complexity. Some, like SketchUp, offer detailed modeling capabilities suited for professionals, while others like Floorplanner and Homestyler are more user-friendly, catering to homeowners and DIY enthusiasts.
These apps allow users to input floor plans and then transform them into 3D models, offering a virtual walkthrough of the space.
How to create 3D house plans?
Creating 3D house plans typically involves using specialized software like SketchUp, Revit, or AutoCAD to transform 2D floor plans into three-dimensional models. The process starts with importing or drawing the 2D floor plan in the software. Then, you’ll use various tools within the software to build walls, add floors, and insert architectural elements like doors and windows.
The final step involves adding textures, colors, and furnishings to bring the house plan to life. It’s a skill that requires practice, but many online tutorials can guide beginners through the process.
How much does a 3D floor plan cost?
The cost of a 3D floor plan can range from $250 to $750 per floor, depending on the complexity and the level of detail required. This price variation depends on factors such as the size of the property, the number of rooms, and the inclusion of furnishings and details.
Customization, like unique textures or furniture designs, can also affect the price. As with any service, it’s beneficial to compare offerings from different providers to ensure you receive a fair price for the quality of work you expect.